

Now I am not claiming to have invented this motif - I have seen
pictures of very similar patterns - however in the creation of my circle-square
cushion I didn’t use any patterns or pictures for reference so thought I should
write it down in the form of a tutorial should anyone else like to have a go
and also before I forget how I did it!
This is an easy pattern that a beginner should be able to
pick up quite easily. These circle-square motifs could be used to make all
sorts of things, use your imagination!
I used a cheap DK yarn and a 4mm hook and each square
measures about 4 and a half inches.
This pattern is written using UK crochet terms (UK Double-Crochet = US Single-Crochet, UK Treble-Crochet = US Double-Crochet, UK Half-Treble = US Half-Double, UK Double-Treble = US Triple)
So, to start - create a magic circle (if you are not sure how
to do this there are some great tutorials on youtube, or you can simply chain 6
and join to make a ring). Chain 3 (counts as one Treble)

and then crochet 11
Trebles into the ring.

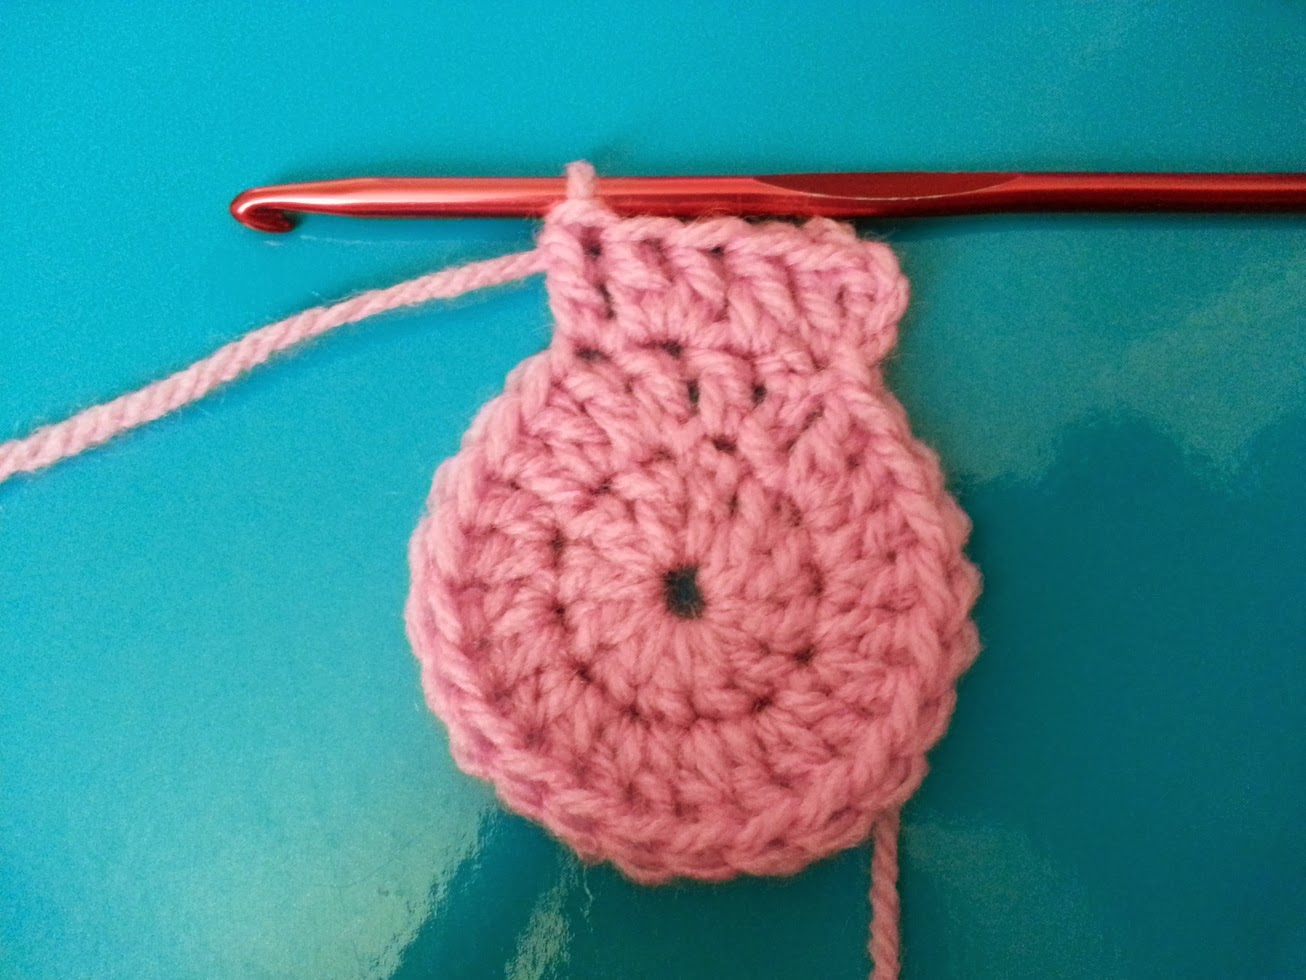
Now if you pull the tail of the ring it should all gather up to make it so your last stitch comes around to meet the initial Chain 3, like so:

Join with a slip stitch into the top of the initial Chain 3, where my needle is showing in the picture below:

Give yourself a pat on the back, your first round is made!
Round 2
Chain 3 and then crochet 1 Treble into the very base of this Chain 3, your hook will be going into the little space where my needle is showing below:

and should look something like this when you have done that Treble:

Carry on crocheting 2 Trebles into each stitch around so
that by the end of the round you have 24 stitches in total. Again, join with a slip stitch to the top of
the initial Chain 3 at the start of the round, where my needle is in the picture below:

Another pat on the back, Round 2 is finished!
Round 3
Chain 3 and again do a Treble into the base of this chain 3
(as in the previous round).

Crochet 1 Treble into the next stitch then 2 Trebles into the next stitch.
Keep repeating this all the way around, 1 Treble into the
next stitch, 2 Trebles into the next stitch.
At the end of the round, you
guessed it, slip stitch into the top of the initial Chain 3 at the start of the
round. You should have 36 stitches in total.

The circle is nearly finished, just one more round to go.
(Remember, if the hole in the middle starts to gape a bit you can always pull it shut by gently pulling on the tail from the magic circle).
Round 4
Chain 3 and crochet 1 Treble into the base of the chain 3,
the same as at the beginning of the previous two rounds.

Crochet 1 Treble into
each of the next two stitches then 2 Trebles into the next stitch.
Repeat this around, 1 Treble into each of the next two
stitches, 2 Trebles into the next stitch:

Join with a slip stitch to the top of the initial chain 3
and fasten off:

The circle bit is made! You should have 48 stitches in total -
If you have, give yourself another pat on the back you have made a coaster :)
Now the squaring bit.
Put your hook in the top of the chain where you did your last slip stitch to join the round and pull a loop of your new colour through:

Chain 1:

At this point it is worth remembering to crochet over the tail ends of both yarns (the green and pink) for the next few stitches, to save tiresome sewing in later.
Crochet one Double-Crochet (DC) stitch into the same space you have just done your chain stitch, it should look like this:

For the rest of this round we are working out of BACK LOOPS ONLY. This gives the circle a nice definite shape.
Next crochet another 4 DC, one into each of the next 4 stitches, starting where my needle is showing in the picture below:

you should now have this:

We will be working a Half-Treble Crochet stitch into each of the next 2 stitches. If you are not sure how to do this stitch, I hope this explains it for you:
You start making the stitch the same as you would with a normal Treble, yarn over, put your hook in the next stitch (back loop only), yarn over and pull through to the front so it looks like this:

Now yarn over and pull through all three loops on your hook. That's it, simple!

Do another one of these Half-Trebles into the next stitch and a normal Treble into the next stitch:

You can probably tell from the slope that these stitches are making that we are coming up to the first corner.
The corner is made by crocheting 2 Double-Treble stitches - do you know how to do these? Here is a quick demonstration.
The principal is the same as a normal Treble but we wrap the yarn around the hook twice before we put it in the next stitch, like this:

Now yarn over and pull it back through to the front:

Yarn over and pull it through the first two loops on your hook:

Yarn over and pull it through the next two loops on your hook:

Yarn over and pull it through the last two loops on your hook:

You can see in the picture above I have carried on and made the second Double-Treble stitch into the same space.
Chain 1 and work 2 more Double-Trebles into the same space as the previous two stitches. It might be a bit of a squeeze but should be OK as when you work in back loops only they tend to have more give:

That is the first edge and corner made of the 'squaring'. The pattern from here is the same as we have just done but in reverse, so: 1 Treble into the next stitch, 1 Half-Treble into each of the next 2 stitches:

1 Half-Treble into each of the next 2 stitches
1 Treble into the next stitch
2 Double-Trebles into the next stitch, chain 1 and then 2 more Double-Trebles into the same stitch
1 Treble into the next stitch
1 Half-Treble into each of the next 2 stitches

1 DC into each of the next 5 stitches
1 Half-Treble into each of the next 2 stitches
1 Treble into the next stitch
2 Double-Trebles into the next stitch, chain 1 and then 2 more Double-Trebles into the same stitch
1 Treble into the next stitch
1 Half-Treble into each of the next 2 stitches
3 corners made.
1 DC into each of the next 5 stitches
1 Half-Treble into each of the next 2 stitches
1 Treble into the next stitch
2 Double-Trebles into the next stitch, chain 1 and then 2 more Double-Trebles into the same stitch
1 Treble into the next stitch
1 Half-Treble into each of the next 2 stitches
that should bring you back around to the start, slip stitch into the first DC of the round to finish the squaring:

Phew, that's the complicated bit done, the rest is just straightforward Trebles and chains.
To start your last row chain 3 and then work 1 Treble into each of the next 9 stitches, working through both loops:

Working out of the chain space in the corner of the square work 2 Trebles, chain 1, 2 Trebles:

Starting where my needle is showing in the picture below, crochet a Treble in each stitch along the row:

Like so:

Back to the corner, 2 Trebles, Chain 1, 2 Trebles.
Carry on like this all the way around your square, slip stitch into the top of the initial chain 3 at the start of the round and fasten off, your circle square has been made!

I think that deserves and extra large pat on the back, a cup of tea and a biscuit :)
To cover and 18 inch cushion pad I made 16 of these motifs for the front and a large granny square for the back but you could make both sides with these circle-squares or turn them into anything else you like! I can't really say how much yarn it took to make, the main colour (the green in this example) including all the sewing together took about a full 100g ball but as for the other colours I really couldn't say but it is a great way to use up scraps.
I hope you enjoyed my first tutorial, if you have spotted any problems with it or would like to give any feedback please post a comment.
© abijamtastic 2014. Please respect my copyright and do not resell, publish, or distribute this pattern. However, you are free to use the final items you make from the pattern for charity, gifting, or selling in limited numbers. A link back to my webpage is greatly appreciated :)
No comments:
Post a Comment