

To make this bag you will need:
A 5mm normal crochet hook
Various colours of Double Knit yarn, approximately 150g in total.
Optional - A 5mm Tunisian Crochet hook (for the straps, however an alternative way of making the straps is given if you don't have a Tunisian hook)
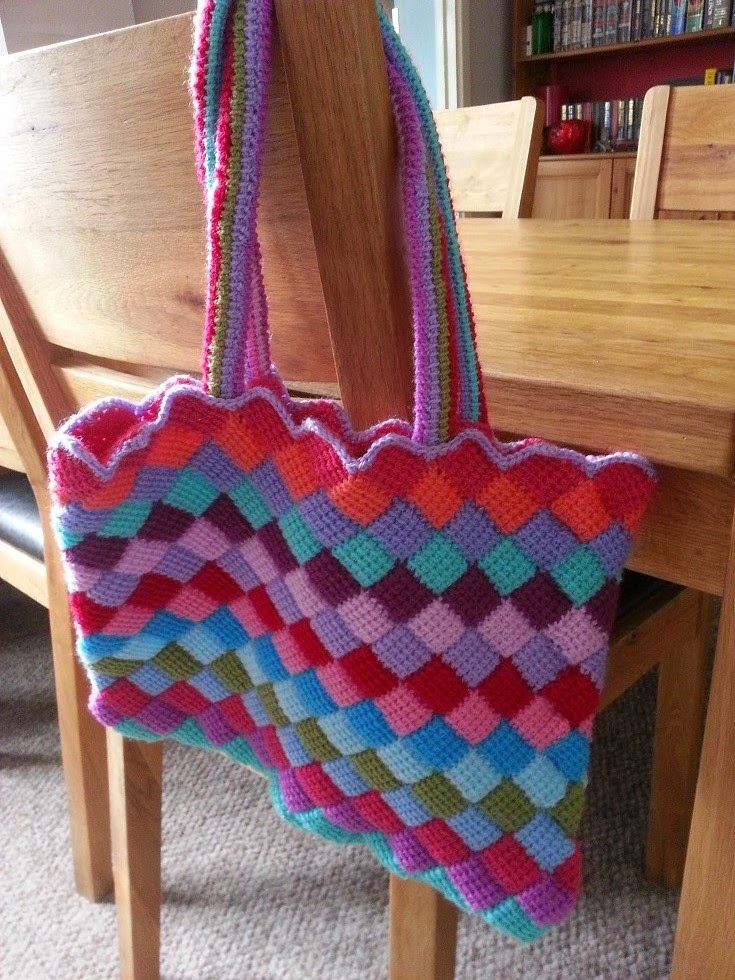
The finished bag measures approximately 40cm square
Tunisian Entrelac crochet is very simple when you get the hang of it and understand the basic principles of how it is made.
It is worked in rows of Entrelac Squares in a diamond formation, right to left. Always work with the Right side facing you, do not turn your work.
These Entrelac squares are each made of 5 rows of Tunisian Simple Stitch (which consists of a Forward Pass and a Return pass) and 1 row of Slip Stitches across the top of the square. It is important to make sure that the overall tension is not too tight; the fabric this type of crochet makes is very dense and it needs to ‘breath’. This is very important for the row of slip stitches as we will be crocheting out of them in the next rows so they need to be loose!
This basic Entrelac pattern can be adapted to make cushions, throws and blankets.
First Side of the bag
To begin, make a foundation chain of 100. When working the first row of each square out of the foundation chain, work through the top loops of the chain only to help prevent curling.
First Enetrelac Row (9 squares across)
First Square
First Forward Pass – Insert hook in next chain, yarn over and bring your hook back through the
chain (2 loops on hook). *Insert hook in next chain, yarn over and bring back through the chain* - repeat this 5 times until you have 7 loops on your hook.

Return pass –
*yarn over and through 2 loops on hook* - repeat this 6 times until you have 1
loop left on your hook.
Forward Pass rows 2-5
– Insert hook in second vertical post (where the needle is showing in the
picture), yarn over and back through the vertical post.

Insert hook in next vertical post, yarn over and back
through the vertical post. Repeat this 5 times in each vertical post along the
row (6 loops on hook).
Insert hook through next chain of your foundation chain row,
yarn over and bring back through the chain (7 loops on hook)
Return Pass –
*yarn over and through 2 loops on hook* - repeat this 6 times until you have 1
loop left on your hook.
Row 6 – Loosely slip stitch across the top of the row by putting
your hook under the next vertical post, yarn over and through 2 loops. Repeat
this 5 times. Slip stitch in next chain of your foundation chain row (6 Slip
stitches made). This last loop on your hook is the starting point of the next
square.

Second to Ninth Square - Repeat as above. To help you remember, Forward Passes have 7 loops on your hook, Return Passes *yarn over and through 2 loops* 6 times.
At the end of the ninth square you should have one chain left, slip stitch into this chain and fasten off leaving a long tail length for sewing in later.
Second Entrelac Row (8 squares)
First Square
First Forward Pass – Join a new colour by drawing up a loop in the first slip stitch of the top right corner of the first square of the previous row.

Do not chain or knot the yarn to hold it in place as this
will give a lumpy finish. Just start working with the yarn leaving a long
enough tail to secure it later.
Insert hook in next slip stitch, yarn over and back through
– repeat this 5 times (6 loops on hook).
Insert
your hook in the first stitch of the next square – put your hook all the way
through to the back of the work, yarn over, pull back through to the front (7
loops on hook)

Return Pass –
*yarn over and through 2 loops* - repeat this 6 times until you have 1 loop
left on your hook.
The
next forward pass is made through the vertical posts of the previous row (as
with the first row of squares). Insert
your hook through the vertical post, yarn over and back through 5 times (6
loops on hook) now put your hook through the next stitch of the next square
from the first row of squares:

Return Pass –
*yarn over and through 2 loops on hook* - repeat this 6 times until you have 1
loop left on your hook.
When 5 rows have been made, slip stitch across the top of
the row (as with the first row of squares) making your sixth and final slip
stitch into the top right corner of the next square of the previous row.
Carry on working squares across the row in the same way
until 8 squares are made. Fasten off.
Third Entrelac Row
(9 squares)
As this row has more squares in we need to make a small
foundation chain to work the first square out of.
Chain 6 and starting in the second loop from your hook,
insert your hook (in the top loop of the chain only), *yarn over and back
through* repeat this in each chain (6 loops on hook) now insert your hook in
the first stitch of the first row of the first square of the previous row: 
Yarn over, back through to front of work (7 loops on hook)
Return Pass –
*yarn over and through 2 loops* - repeat this 6 times until you have 1 loop
left on your hook.
Carry on making the squares as with the previous squares so
each square has 5 rows of Tunisian Simple Stitch and one row of slip stitches
across the top. Make 7 more squares in the same way as with the previous row of
squares.
For the last (ninth) square of this row - Draw up the loops through the slip stitches as with the previous squares of the row (6 loops on hook), make the 7th loop by inserting your hook in the corner slip stitch of the first row of Entrelac squares.
IMPORTANT! RETURN
PASS CHANGES
Return Pass - Yarn
over and through 1 loop on hook *Yarn over and through 2 loops* 6 times until
you have 1 loop left on your hook.
Repeat Second and Third Entrelac square rows until you have 16
rows in total.
The Other side of the bag is made in the same way however
the number of squares in each row is different; start with a foundation chain
of 89 and make 8 squares in the first row. The second row is 9 squares, then 8,
then 9 and so on until you have made 16 rows. I followed the same colour sequence for the front and back of the bag so that when it is sewn up both sides match.
Using the tail ends of each row, sew the front and back of
the bag together. Do this by placing right sides of the bag together and sewing
along the edge. Make sure the colours match up so it appears as if each colour
goes all around the bag with no join.
To finish off the top of the bag Crochet a neat row of
normal double crochet all around. At the point of each square do 2 Double
crochets and in the dips do a double crochet decrease, (or DC 2 together).
The straps of my bag were made by making several rows of
Tunisian Simple Stitch on a Tunisian crochet hook (approximately 100 stitches
each row). An alternative way of making the straps is to chain 10, DC in each
chain across, *chain 1 turn, DC in each stitch across* - repeat until you reach
the length of strap that you want, changing colour where you wish.
Sew up the long edges of the strap to make a tube and then
sew the ends of the strap onto the body of the bag. Make two.
There you have it, one bag made! Please do share any pictures of your finished bags by twitter @hookingcrazy or on facebook.com/hookingcrazy I would love to see them!
If you find any errors in this pattern please leave me a comment below and I will try my very best to fix them or if you get stuck on any bit of it, let me know and I will try to help. Thanks for choosing my Tunisian Entrelac Tote Bag pattern xxx
© abijamtastic 2014. Please respect my copyright and do
not resell, publish, or distribute this pattern. However, you are free to
use the final items you make from the pattern for charity, gifting, or selling
in limited numbers. A link back to my webpage hookingcrazy.blogspot.co.uk is
greatly appreciated :)
I love this. Thanks so much for the step by step tutorial. I can't wait to try it :)
ReplyDeleteyou are most welcome! xxx
DeleteHi love the look of this bag and am just trying to make it. I've never done entrelac crochet before so I struggled a bit with working out the last square of the 2nd row as you aren't working into another square but a quick youtube tutorial and i was fine. Also you don't explain how to close up the bottom of the bag. Do i just sew it closed so the points interlock? Thanks
ReplyDeleteHi Claire, thanks for having a go at this bag and for your feedback. i will add a couple of lines into the pattern to clarify what you do with the last square on the rows where you aren't working into the square from the previous row. I'm glad you managed to get there with the help of youtube.
DeleteAlso for pointing out that I haven't said what you do with the bottom of the bag, you are right, just sew it up so the two sides interlock (like a zig-zag jigsaw) and poke the bottom corners of the bag in and sew them closed so you have a nice neat finish. I would love to see a picture when you've finished, I do hope it turns out well XXX
Ok great, thanks for your help, i'll post up a pic when it's finished. Enjoying making it so far :)
ReplyDeleteI can't wait to try this! Your pictures are so clear and easy to understand! Best I've seen yet! Thanks!
ReplyDeleteThanks for your pattern. It's just what I was looking for to make my sister as a gift. Can't wait to try it!
ReplyDeleteHiya I am new to this stitch. I loved making this bag. Got the 2 sides done how do I sew them together, it has me confused what way they should be sewing.
ReplyDeleteThank You !
ReplyDelete